Upgrading to Solr 9.5.0 and ZooKeeper 3.8.4
Condition
The Solr version is at least 8.11.1 but behind 9.5.0 and the ZooKeeper version at least 3.6.2 but behind 3.8.4.
Note: We strongly recommend backing up your existing Solr and ZooKeeper configuration and data.
Note: You will need to configure Basic Authentication prior to or after upgrading to Solr 9.5.0
Note: If you uploaded your initial Solr configset without Basic Authentication enabled, you should delete it and upload it again once you have enabled Basic Authentication.
All index data will be retained.
Cause
New versions of Solr and ZooKeeper have been released and made compatible with eperi sEcure Platform.
Remedy
Procedure
-
Upgrading ZooKeeper from 3.6.2 to 3.8.4
- Connect to the target server(s) using your preferred ssh tool (e.g., PuTTY) and log in.
-
Before you begin, stop the Solr and ZooKeeper services on all cluster nodes.
systemctl stop solr && systemctl stop zookeeper -
Proceed with the upgrade of your ZooKeeper installation
- Change to the parent directory of your ZooKeeper installation
cd /opt - Backup the modified configuration files of your ZooKeeper installation
mkdir solr_upgrade && cp ./zookeeper/conf/zoo.cfg \ ./zookeeper/conf/java.env /var/lib/zookeeper/data/myid ./solr_upgrade - Download and extract the ZooKeeper archive and change the ownership of the extracted folder to the zookeeper user
wget -O apache-zookeeper-3.8.4-bin.tar.gz \ https://archive.apache.org/dist/zookeeper/zookeeper-3.8.4/apache-zookeeper-3.8.4-bin.tar.gz tar xzf apache-zookeeper-3.8.4-bin.tar.gz chown -R zookeeper:zookeeper apache-zookeeper-3.8.4-bin - Remove the symlink to the old ZooKeeper installation and create a new symlink that points to the new directory
rm zookeeper ln -s apache-zookeeper-3.8.4-bin zookeeper - Copy the previously saved configuration files back to your new ZooKeeper installation directory and set the owner to the zookeeper user
cd /opt cp ./solr_upgrade/*.* ./zookeeper/conf/ cp ./solr_upgrade/myid /var/lib/zookeeper/data/ chown zookeeper:zookeeper ./zookeeper/conf/* /var/lib/zookeeper/data/myid - Start the ZooKeeper service again
systemctl start zookeeper
- Change to the parent directory of your ZooKeeper installation
- Repeat previous step including all Substeps on all cluster nodes
- Continue with Setting the urlScheme to https (without starting Solr).
You have successfully upgraded ZooKeeper to version 3.8.4. -
Upgrading Solr from 8.11.1 to 9.5.0
-
Change to the parent directory of your Solr installation
cd /opt -
Download and extract the Solr archive
wget -O solr-9.5.0.tgz https://archive.apache.org/dist/solr/solr/9.5.0/solr-9.5.0.tgz tar xzf solr-9.5.0.tgz -
Copy your Solr SSL certificates to the new Solr installation directory and change the ownership of the extracted folder to the solr user.
cp -p solr/ssl/* ./solr-9.5.0/server/etc/. -
Remove the symlink to the old Solr installation
rm solr -
Switch to the bin directory of the extracted Solr archive
cd ./solr-9.5.0/bin/ -
Run the Solr installation script with the upgrade flag -f and manual start flag -n
./install_solr_service.sh ../../solr-9.5.0.tgz -f -n -
Add the following settings to /etc/default/solr.in.sh:
SOLR_JETTY_HOST="0.0.0.0" SOLR_MODULES="scripting" -
Start the Solr service
systemctl start solr - Repeat all steps on all cluster nodes
You have successfully upgraded Solr to version 9.5.0 -
Change to the parent directory of your Solr installation
-
Upgrading the Solr configset to version 4
Note: This step only needs to be completed on one of the Solr Cluster nodes
-
Upload the new solr_o365_configset_v4.zip configset to a Solr node and unzip its contents to a temporary folder:
unzip -d /tmp/solr_o365_configset_v4 /tmp/solr_o365_configset_v4.zip -
Deploy the new configset to all nodes.
The following ZooKeeper script will take the new configset and copy it to each Solr server of the deployment.
/opt/solr/server/scripts/cloud-scripts/zkcli.sh -zkhost server1:2181,server2:2181,server3:2181 \ -cmd upconfig -confdir /tmp/solr_o365_configset_v4 -confname eperi_o365Output upon success:
INFO - 2024-04-15 10:46:22.966; org.apache.solr.common.cloud.ConnectionManager; Waiting up to 30000ms for client to connect to ZooKeeper INFO - 2024-04-15 10:46:23.010; org.apache.solr.common.cloud.ConnectionManager; zkClient has connected INFO - 2024-04-15 10:46:23.010; org.apache.solr.common.cloud.ConnectionManager; Client is connected to ZooKeeper INFO - 2024-04-15 10:46:23.120; org.apache.solr.core.NodeConfig; Loading solr.xml from SolrHome (not found in ZooKeeper) INFO - 2024-04-15 10:46:23.121; org.apache.solr.core.SolrXmlConfig; Loading solr.xml from ./../../solr/solr.xml INFO - 2024-04-15 10:46:23.169; org.apache.solr.common.cloud.ConnectionManager; Waiting up to 15000ms for client to connect to ZooKeeper INFO - 2024-04-15 10:46:23.180; org.apache.solr.common.cloud.ConnectionManager; zkClient has connected INFO - 2024-04-15 10:46:23.181; org.apache.solr.common.cloud.ConnectionManager; Client is connected to ZooKeeper -
Reload the collections.
cd /opt/solr/server/etc # Reload the microsoft_teams collection curl -k -E O365-Solr-Cluster.client.cer.pem --key O365-Solr-Cluster.client.key.pem --user solr:<password> 'https://localhost:8983/solr/admin/collections?action=RELOAD&name=microsoft_teams' # Reload the o365 collection curl -k -E O365-Solr-Cluster.client.cer.pem --key O365-Solr-Cluster.client.key.pem --user solr:<password> 'https://localhost:8983/solr/admin/collections?action=RELOAD&name=o365' # Reload the o365_sharepoint collection curl -k -E O365-Solr-Cluster.client.cer.pem --key O365-Solr-Cluster.client.key.pem --user solr:<password> 'https://localhost:8983/solr/admin/collections?action=RELOAD&name=o365_sharepoint'Sample output for each reload:
Enter PEM pass phrase: { "responseHeader":{ "status":0, "QTime":13 } } -
Restart the Solr service
systemctl restart solr - Optional: If Basic Authentication has just been configured, reconfigure the Solr services in eperi sEcure Platform, following Configuring the Solr services in eperi sEcure Platform
-
Optional: Verify Solr configsets.
Log in to Solr via https://<SolrNodeHostname>:8983/ (replace <SolrNodeHostname> with the hostname of one of your Solr nodes) and use the login you defined in SOLR_AUTHENTICATION_OPTS located in /etc/default/solr.in.
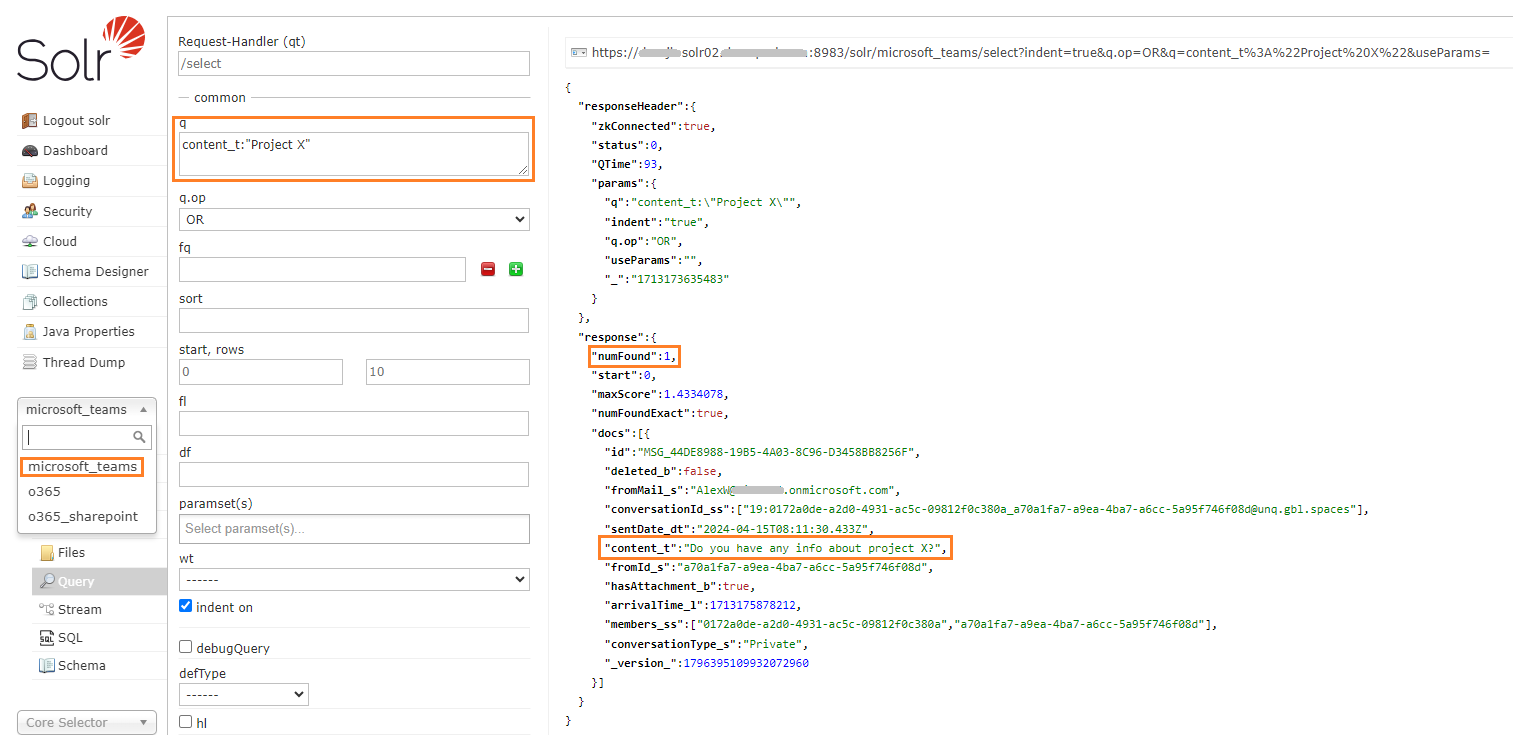
In this example, the microsoft_teams collection was selected from the Collection Sele... dropdown.
After selecting Query to open the query form, searching for Project X reveals a single chat message, indicating that the configset for Teams is functional.
Figure 1: Test the microsoft_teams configset
You have successfully reuploaded the Solr configset with Basic Authentication. -

Upload the new solr_o365_configset_v4.zip configset to a Solr node and unzip its contents to a temporary folder: