
Upgrading to a new release

How to upgrade your current eperi sEcure Platform installation to a new release.

Before you begin

  • The eperi sEcure Platform has been installed using the automated installation packages. In the case of a manual deployment with the WAR file, please refer to Upgrading to a new eperi sEcure Platform WAR file.
  • A user with admin rights is required.

About this task

Important: In a cluster setup with multiple eperi sEcure Platform nodes proceed as follows:
  1. Shut down all eperi sEcure Platform nodes in the cluster.
  2. Back up the eperi sEcure Platform and Token database.
  3. Perform the upgrade of the first eperi sEcure Platform node as described below while keeping the other nodes offline.
  4. Proceed in the same pattern with all other eperi sEcure Platform nodes.
Important: The procedure described below applies if you have already installed a release of version 19.8.1.0 or higher. If you are upgrading from a release <=19.7.1.0 to a release 19.8.1.0 or higher, perform the upgrade as described in Upgrading from a release <=19.7.1.0 to a release >= 19.8.1.0.

Procedure

  1. Connect to the target server using your preferred ssh tool (e.g. putty) and log in.
  2. Shut down the services of the eperi sEcure Platform by executing the following commands:
    Note: The systemctl command is valid for Ubuntu 16.04 and higher. For older versions, please use the service command.
    Important: In a cluster setup, shut down every eperi sEcure Platform instance! This is very important to keep the eperi sEcure Platform and Token database consistent!
    sudo systemctl stop eperi-gateway
    sudo systemctl stop eperi-milter
    sudo systemctl stop postfix
  3. Backup the eperi sEcure Platform and Token database according to the procedures defined in your company.
  4. Download the installation packages of the new release from the eperi Customer Portal.
  5. Upload the new installation packages to the target system.
  6. Option 1: To upgrade the Adapter for your respective SaaS application (e.g. Salesforce) manually, perform the following substeps (otherwise continue with the next main step):
    1. If applicable, copy the new Adapter file for your respective SaaS application (e.g. Salesforce) into the tomcat WEB-INF/lib directory:
      sudo cp ca.salesforce-<version>.jar /opt/eperi/gateway/tomcat/webapps/ROOT/WEB-INF/lib
    2. Copy additional JAR files needed for the appropriate Adapter into the .../WEB-INF/lib directory. In case of the Salesforce Adapter, these are, for example, the following files:
      • rhino-1.7R4.jar
      • super-csv-2.4.0.jar
    3. Change to the .../WEB-INF/lib directory.
    4. Check, if the user and the group of the Adapter file as well as the additional JAR files is eperi.
    5. If this is not the case, change it as follows:
      sudo chown eperi:eperi ca.salesforce-<version>.jar
    6. Remove the old version of the Adapter file:
      sudo rm ca.salesforce-<old-version>.jar
    7. Remove the old versions of the additional JAR files, for example:
      sudo rm rhino-<old-version>.jar
      sudo rm super-csv-<old-version>.jar
  7. Navigate to the directory where you copied the installation packages.
  8. Execute the package manager with root privileges to install the new version of the eperi sEcure Platform, for example:
    For Ubuntu:
    sudo dpkg -i eperi-gateway-<version>.x86_64.deb
    For RHEL:
    sudo rpm -U eperi-gateway-<version>.<RHEL-version>.x86_64.rpm
    For SLES:
    sudo rpm -U eperi-gateway-<version>-<buildnumber>.sles15.x86_64.rpm
    The old version of the application under /opt/eperi/gateway/tomcat/webapps/ROOT is automatically backed up to /opt/eperi/gateway/backup/<current date/time> and the new version is installed.
    Note:

    For Ubuntu:During the setup, you may be asked, which version of a configuration file should be used. If you have modified such a configuration file before, please review the differences and merge them manually.
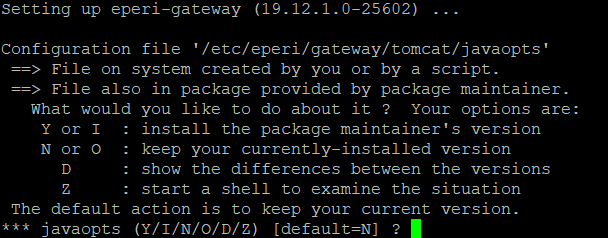
    Note: For RHEL:In case a configuration file has changed, the currently installed configuration file remains untouched. The new version of the file (from the installation package) is saved as <filename>.rpmnew.
  9. Option 2: To upgrade the Adapter for your respective SaaS application (e.g. Salesforce) with the installation package, execute the package manager with root privileges:
    For Ubuntu:
    sudo dpkg -i eperi-adapter-sfdc-<version>.x86_64.deb
    For RHEL:
    sudo rpm -U eperi-adapter-sfdc-<version>.<RHEL-version>.x86_64.rpm
    For SLES:
    sudo rpm -U eperi-adapter-sfdc-<version>-<buildnumber>.sles15.x86_64.rpm
    Note: If you are upgrading from a version without Adapter installation package, you must remove all old JAR files of the Adapter before upgrading with the adapter installation package!
  10. Restart the eperi sEcure Platform services:
    Important: Before you (re)start the Postfix SMTP Relay, please make sure that the eperi sEcure Platform is up and running. This is the case if you can access the log-in page of the eperi sEcure Platform Admin Console.
    For Ubuntu:
    sudo systemctl start eperi-gateway
    sudo /etc/init.d/postfix start
    sudo systemctl start eperi-milter
    For SLES:
    sudo systemctl start eperi-gateway
    sudo systemctl start postfix
    sudo systemctl start eperi-milter
  11. For Ubuntu:When prompted to enter the Master Key on the command line, please enter it within 90 seconds. Otherwise you are requested to enter it later via the (old) GUI of the Admin Console.
  12. For RHEL:When prompted to enter the Master Key on the command line, please enter it within 90 seconds as follows (otherwise you are requested to enter it later via the (old) GUI of the Admin Console):
    1. Open a new SSH window (or TTY session).
    2. Enter systemd-tty-ask-password-agent
    3. Enter the Master Key.
  13. Launch the eperi sEcure Admin Console and log in.
  14. Restart the proxy service on the Dashboard page.
    Figure 1: Restart the proxy service
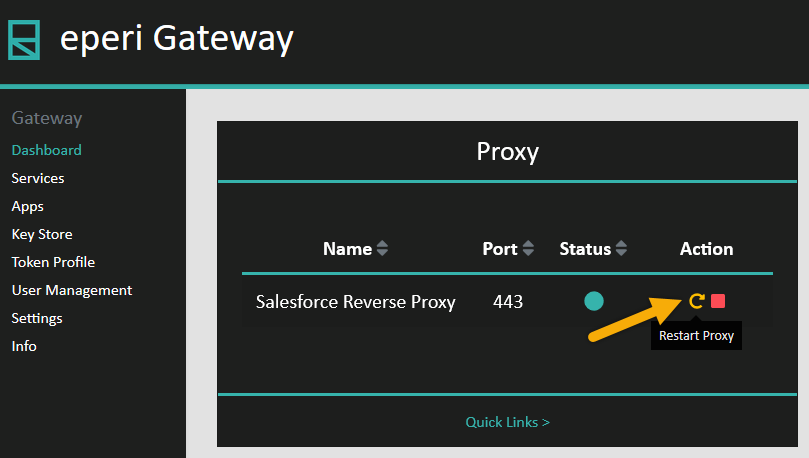
    Restart the proxy service

Results

You have successfully upgraded the eperi sEcure Platform.